This article covers the process of creating a video playlist using HTML, CSS, and JavaScript. It provides an overview of the steps involved, including setting up the HTML structure, styling the playlist with CSS, and adding interactivity with JavaScript. The article is suitable for anyone looking to learn how to create a video playlist using these technologies.
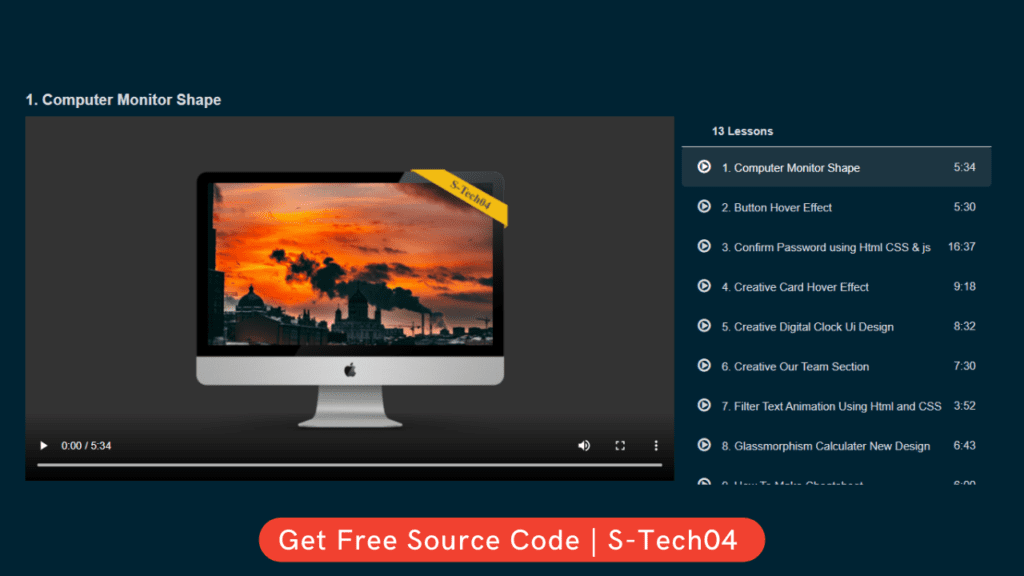
Demo Tutorial of How To Create Video Playlist Using HTML, CSS & JavaScript
To create this program (video playlist). First, you need to create three Files one HTML and CSS File and another one is JavaScript File. After creating these files just paste the following codes in your file.
In the first place, make a HTML document with the name of index.html and paste the given codes in your HTML record. Keep in mind, you’ve to make a document with .html extension.
<!DOCTYPE html>
<html lang="en">
<head>
    <meta charset="UTF-8">
    <meta name="viewport" content="width=device-width, initial-scale=1.0">
    <link rel="stylesheet" href="https://stackpath.bootstrapcdn.com/font-awesome/4.7.0/css/font-awesome.min.css">
    <link rel="stylesheet" href="style.css">
    <title>Html And CSS Video Playlist</title>
    <!-- S-Tech04 | www.youtube.com/STech04 -->
</head>
<body>
    <section>
        <h2 class="title"></h2>
        <div class="container">
            <div id="video_player">
                <video controls id="main-Video" src=""></video>
            </div>
            <div class="playlistBx">
                <div class="header">
                    <div class="row">
                        <span class="AllLessons"></span>
                    </div>
                </div>
                <ul class="playlist" id="playlist">
                </ul>
            </div>
        </div>
    </section>
    <script src="./video-list.js"></script>
    <script src="./script.js"></script>
</body>
</html>
Second, make a CSS record with the name of style.css and paste the given codes in your CSS document. Keep in mind, you’ve to make a record with .css extension.
*
{
    margin: 0;
    padding: 0;
    box-sizing: border-box;
}
body::-webkit-scrollbar
{
   width: 10px;
}
body::-webkit-scrollbar-thumb
{
   height: 80px;
   background: #375666;
   border: 8px solid transparent;
   border-radius: 12px;
}
body::-webkit-scrollbar-thumb:active
{
    background: #003349;
}
body
{
    font-family: sans-serif;
    background: #002333;
}
li
{
    list-style: none;
}
section
{
    display: flex;
    justify-content: center;
    align-items: center;
    flex-direction: column;
    padding: 2.5%;
    min-height: 100vh;
}
.title
{
    font-size: 20px;
    font-weight: 600;
    color: #dcdee1;
    text-align: left;
    width: 100%;
    margin-bottom: 10px;
}
.container
{
    position: relative;
    width: 100%;
    height: 100%;
    display: grid;
    grid-template-columns: 2fr 1fr;
    overflow: hidden;
    /* border: 2px solid red; */
}
.container #main-Video
{
    position: relative;
    width: 100%;
    height: auto;
    overflow: hidden;
    outline: none;
}

.playlistBx
{
    position: relative;
    height: 100%;
    margin: 0 10px 0 10px;
    /* border: 2px solid green; */
}
.playlist
{
    position: absolute;
    width: 100%;
    height: calc(100% - 40px);
    overflow-y: scroll;
    border-top: 1px solid #dcdee1;
}
.playlist::-webkit-scrollbar
{
   width: 0px;
}
.playlistBx .row .AllLessons
{
   display: block;
   text-align: left;
   color: #dcdee1;
   font-size: 15px;
   font-weight: 700;
   margin-left: 40px;
   line-height: 40px;
}
.playlist li
{
   display: flex;
   justify-content: space-between;
   align-items: center;
   list-style: none;
   color: #dcdee1;
   cursor: pointer;
   border: 1px solid transparent;
   padding: 15px 20px;
   border-radius: 5px;
}
.playlist li:hover
{
    border: 0.5px solid #375666;
}
.playlist li .row span
{
    font-size: 15px;
    font-weight: 400;
    color: #dcdee1;
    text-decoration: none;
    display: inline-block;
    text-align: left;
}
.playlist li .row span::before
{
    content: '\f01d';
    font-family: FontAwesome;
    color: #dcdee1;
    margin-right: 15px;
    font-size: 20px;
}
ul li.playing .row span::before
{
    content: '\f28c';
    font-family: FontAwesome;
    color: #fff;
    margin-right: 15px;
    font-size: 20px;
}
.playlist li.playing .row span
{
   color: #fff;
}
.playlist li span.duration
{
    font-size: 15px;
    font-weight: 400;
    display: inline-block;
    color: #dcdee1;
    text-align: right;
}
.playlist li.playing
{
   pointer-events: none;
   background: #1d3541;
   border: 0.5px solid #1d3541;
}

@media(max-width: 1092px){
    section
    {
        padding: 30px 10px;
    }
    .container
    {
        width: 100%;
        display: grid;
        grid-template-columns: repeat(1,1fr);
        overflow: hidden;
    }
    .container #main-Video
    {
        height: 100%;
    }
    .playlistBx
    {
        height: 380px;
        margin-top: 10px;
    }
    .playlist
    {
        position: absolute;
        width: 100%;
        height: calc(100% - 40px);
        overflow-y: scroll;
    }
}
3rd, create a JavaScript file with the name of video-list.js and paste the given codes in your JavaScript file. Remember, you’ve to create a file with .js extension.
let allVideos = [
   {
      name: "Computer Monitor Shape",
      src: "./media/Computer Monitor Shape - Using Html and CSS",
      id: "vid_1"
   },
   {
      name: "Button Hover Effect",
      src: "./media/Button Hover Effect Using Html And CSS",
      id: "vid_2"
   },
   {
      name: "Confirm Password using Html CSS & js",
      src: "./media/Confirm Password using Html CSS & js",
      id: "vid_3"
   },
   {
      name: "Creative Card Hover Effect",
      src: "./media/Creative Card Hover Effect ",
      id: "vid_4"
   },
   {
      name: "Creative Digital Clock Ui Design",
      src: "./media/Creative Digital Clock Ui Design - Html Css & Vanilla Javascript-1",
      id: "vid_5"
   },
   {
      name: "Creative Our Team Section",
      src: "./media/Creative Our Team Section Using HTML & CSS Neumorphism",
      id: "vid_6"
   },
   {
      name: "Filter Text Animation Using Html and CSS",
      src: "./media/Filter Text Animation Using Htm and Pure CSS",
      id: "vid_7"
   },
   {
      name: "Glassmorphism Calculater New Design",
      src: "./media/Glassmorphism Calculater New Design Html",
      id: "vid_8"
   },
   {
      name: "How To  Make Cheatsheet",
      src: "./media/How To Make Cheatsheet Using Html, CSS and Javascript",
      id: "vid_9"
   },
   {
      name: "How to create Login Form",
      src: "./media/How to create Login Form Using Html and CSS",
      id: "vid_10"
   },
   {
      name: "How To Make Animated Menu Icon",
      src: "./media/How To Make Animated Menu Icon Using Html",
      id: "vid_11"
   },
   {
      name: "How to make Read More Function",
      src: "./media/How to make Read More Function using Html",
      id: "vid_12"
   },
   {
      name: "Vertical Navigation Bar",
      src: "./media/Vertical Navigation Bar Using Html And CSS",
      id: "vid_13"
   }
]
last, create a JavaScript file with the name of script.js and paste the given codes in your JavaScript file. Remember, you’ve to create a file with .js extension.
// let's select all required tags or elements
const mainVideo = document.querySelector('#main-Video');
const musicList = document.querySelector('.music-list');
const playlist = document.getElementById('playlist');
const AllLessons = document.querySelector('.AllLessons');
const videoTitle = document.querySelector('.title');


const ulTag = document.querySelector("ul");
AllLessons.innerHTML = `${allVideos.length} Lessons`


let musicIndex = 1;
window.addEventListener('load',()=>{
   loadMusic(musicIndex);
   playingNow();
})
function playMusic(){
   mainVideo.play();
   playlist.classList.add('active')
}
function loadMusic(indexNumb){
   mainVideo.src = `${allVideos[indexNumb - 1].src}.mp4`;
   videoTitle.innerHTML = `${indexNumb}. ${allVideos[indexNumb - 1].name}`

}

for(let i = 0; i < allVideos.length; i++){
   let liTag = `<li li-index="${i + 1}">
      <div class="row">
         <span>${i + 1}. ${allVideos[i].name}</span>
      </div>
      <video class="${allVideos[i].id}" src="${allVideos[i].src}.mp4" style="display: none;" title="${allVideos[i].name}"></video>
      <span id="${allVideos[i].id}" class="duration"></span>
   </li>`;
   playlist.insertAdjacentHTML('beforeend',liTag);

   let liVideoDuration = ulTag.querySelector(`#${allVideos[i].id}`)
   let liVideoTag = ulTag.querySelector(`.${allVideos[i].id}`);


   liVideoTag.addEventListener("loadeddata", ()=>{
      let videoDuration = liVideoTag.duration;
      let totalMin = Math.floor(videoDuration / 60);
      let totalSec = Math.floor(videoDuration % 60);
      // if totalSec is less then 10 then add 0 at the beginging
      totalSec < 10 ? totalSec = "0"+ totalSec : totalSec
      liVideoDuration.innerText = `${totalMin}:${totalSec}`;
      // adding t duration attribe which we'll use below
      liVideoDuration.setAttribute("t-duration", `${totalMin}:${totalSec}`);
   })
}
// let's work on play particular song on click
const allLiTags = playlist.querySelectorAll('li');
function playingNow(){
   for(let j = 0; j<allVideos.length; j++){
      if(allLiTags[j].classList.contains('playing')){
         allLiTags[j].classList.remove("playing")
      }
      if(allLiTags[j].getAttribute('li-index')==musicIndex){
         allLiTags[j].classList.add('playing')
      }
      // adding onclick attribute in all li tags
      allLiTags[j].setAttribute("onclick", "clicked(this)")
   }
}

function clicked(element){
   // getting li index of particular clicked li tag
   let getIndex = element.getAttribute("li-index");
   musicIndex = getIndex;
   loadMusic(musicIndex);
   playMusic();
   playingNow();
}
That’s all, now you’ve successfully created a program to How to create video playlist using HTML, CSS & JavaScript. If your code doesn’t work or you’ve faced any error/problem, please download the source code files from the given download button. It’s free and a .zip file will be downloaded then you’ve to extract it.
Click on the following download button to download all source code files.
Click on the following button to download source code for embed links