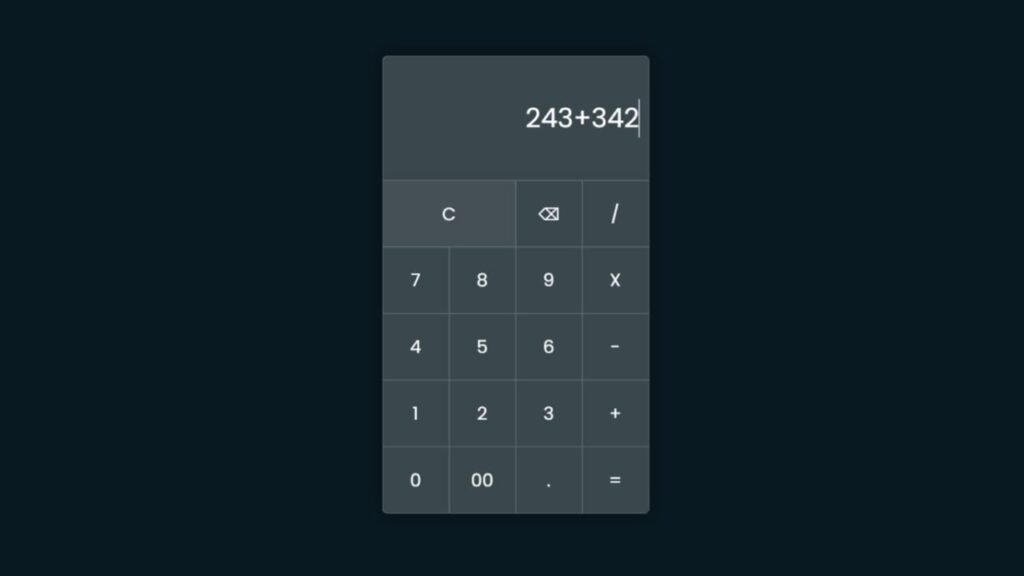
Glassmorphism is a design trend that has gained popularity in recent years due to its sleek, futuristic look. It involves the use of transparent and semi-transparent elements over solid backgrounds, creating an effect that is similar to looking through a sheet of glass. If you’re a web designer or developer looking to incorporate this style into your own projects, you may be wondering how to create a glassmorphism calculator with HTML. In this article, we’ll go over the steps you can follow to create your own glassmorphism calculator design.
Before we dive into the technical details, it’s important to have a basic understanding of HTML and CSS. HTML (Hypertext Markup Language) is a standardized system for displaying content on the web. It’s used to define the structure and layout of a webpage, including the text, images, and other media that it contains. CSS (Cascading Style Sheets) is a stylesheet language that is used to control the appearance and formatting of a webpage. It’s used to specify the styles for elements such as font, color, and layout.
With these concepts in mind, let’s take a look at how you can create a glassmorphism calculator using HTML.
Start by setting up the basic structure of your webpage using HTML. This should include the head and body elements, as well as any necessary divs or containers for your calculator.
Next, you’ll want to add some basic styling to your calculator using CSS. This could include things like font sizes, colors, and margins.
To create the glassmorphism effect, you’ll need to add some transparent or semi-transparent elements to your calculator. This can be done using the CSS
opacityproperty, which allows you to specify the level of transparency for an element.You can also use the
background-colorproperty to create a gradient effect, which can add to the glassmorphism look.Finally, you’ll need to add the functionality for your calculator. This will likely involve writing some JavaScript code to handle things like button clicks, calculations, and displaying results.
With these steps in mind, you should now have a good idea of how to create a glassmorphism calculator using HTML. Keep in mind that this is just a basic outline, and there are many other ways you can customize and enhance your calculator to suit your needs. Whether you’re a beginner or an experienced developer, creating a glassmorphism calculator can be a fun and rewarding project that helps you learn more about HTML, CSS, and JavaScript.
Video Tutorial Of How To Create Glassmorphism Calculator New Design Using HTML
If you’re feeling bored while watching the video tutorial on how to create a Glassmorphism Calculator using HTML, you can try following along with the provided code snippets instead. To create this calculator, you’ll need to create two files: an HTML file and a CSS file. Once you have these files set up, you can paste the provided code into them.
To get started, create an HTML document called “index.html” and paste the given code into it. Remember to save the file with the “.html” extension. In the CSS file, you can add the styles that will give your calculator the glassmorphism effect. By following the provided steps and code snippets, you should be able to create your own Glassmorphism Calculator using HTML.
<!DOCTYPE html>
<html lang="en">
<head>
   <meta charset="UTF-8">
   <meta http-equiv="X-UA-Compatible" content="IE=edge">
   <meta name="viewport" content="width=device-width, initial-scale=1.0">
   <link rel="stylesheet" href="style.css">
   <title>Glassmorphism Calculater New Design Html , CSS and javascript</title>

   <!-- Created by S-Tech04 -->

</head>
<body>
   <div class="main">
      <form action="#" name="calc" class="calculator">
         <input type="text" name="textview" class="value">
         <span class="num clear" onclick="document.calc.textview.value = ''">C</span>
         <span class="num" onclick="back()">⌫</span>
         <span class="num" onclick="document.calc.textview.value += '/'">/</span>
         <span class="num" onclick="document.calc.textview.value += '7'">7</span>
         <span class="num" onclick="document.calc.textview.value += '8'">8</span>
         <span class="num" onclick="document.calc.textview.value += '9'">9</span>
         <span class="num" onclick="document.calc.textview.value += '*'">X</span>
         <span class="num" onclick="document.calc.textview.value += '4'">4</span>
         <span class="num" onclick="document.calc.textview.value += '5'">5</span>
         <span class="num" onclick="document.calc.textview.value += '6'">6</span>
         <span class="num" onclick="document.calc.textview.value += '-'">-</span>
         <span class="num" onclick="document.calc.textview.value += '1'">1</span>
         <span class="num" onclick="document.calc.textview.value += '2'">2</span>
         <span class="num" onclick="document.calc.textview.value += '3'">3</span>
         <span class="num" onclick="document.calc.textview.value += '+'">+</span>
         <span class="num" onclick="document.calc.textview.value += '0'">0</span>
         <span class="num" onclick="document.calc.textview.value += '00'">00</span>
         <span class="num" onclick="document.calc.textview.value += '.'">.</span>
         <span class="num" onclick="document.calc.textview.value = eval(document.calc.textview.value)">=</span>
      </form>
   </div>

   <script>
      function back(){
         let exp = document.calc.textview.value;
         document.calc.textview.value = exp.substring(0,exp.length-1)
      }
   </script>
</body>
</html>
Second, make a CSS record with the name of style.css and glue the given codes in your CSS document. Keep in mind, you’ve to make a record with .css extension.
@import url('https://fonts.googleapis.com/css2?family=Poppins:wght@100;200;300;400;500;700;900&display=swap');
*
{
   margin: 0;
   padding: 0;
   box-sizing: border-box;
   font-family: 'Poppins', sans-serif;
}
body
{
   display: flex;
   justify-content: center;
   align-items: center;
   height: 100vh;
   background: #091921;
}
.main
{
   position: relative;
   background: rgba(255,255,255,0.2);
   border-radius: 6px;
   overflow: hidden;
   border-top: 1px solid rgba(255,255,255,0.2);
   border-left: 1px solid rgba(255,255,255,0.2);
   backdrop-filter: blur(15px);
   box-shadow: 0 0 20px rgba(0,0,0,0.4);
}
.main .calculator
{
   position: relative;
   display: grid;
}
.main .calculator .value
{
   grid-column: span 4;
   width: 300px;
   height: 140px;
   background: transparent;
   color: #fff;
   border: none;
   border-right: 1px solid rgba(255,255,255,0.2);
   border-bottom: 1px solid rgba(255,255,255,0.2);
   font-size: 30px;
   text-align: right;
   outline: none;
   padding: 10px;
}
.main .calculator span
{
   display: grid;
   width: 75px;
   height: 75px;
   place-items: center;
   font-size: 20px;
   color: #fff;
   border-right: 1px solid rgba(255,255,255,0.2);
   border-bottom: 1px solid rgba(255,255,255,0.2);
   transition: 0.5s;
   user-select: none;
   -webkit-user-select: none;
   cursor: pointer;
}
.main .calculator .clear
{
   grid-column: span 2;
   width: 150px;
   background: rgba(255,255,255,0.05);
}
.main .calculator span:hover
{
   background: rgba(255,255,255,0.05);
   transition: 0s;
}
.main .calculator span:active
{
   background: #14ff47;
   font-size: 25px;
   color: #192f00;
}
/*

   colors:-
   #091921
   #14ff47
   #192f00
*/
Congratulations, you have successfully created a Glassmorphism Calculator using HTML, CSS, and JavaScript! If you run into any issues or errors while coding, you can download the source code files from the provided download button. Simply click the button to download a free, compressed ZIP file containing all of the necessary source code. Extract the file and use the code within to troubleshoot any issues you may be experiencing.