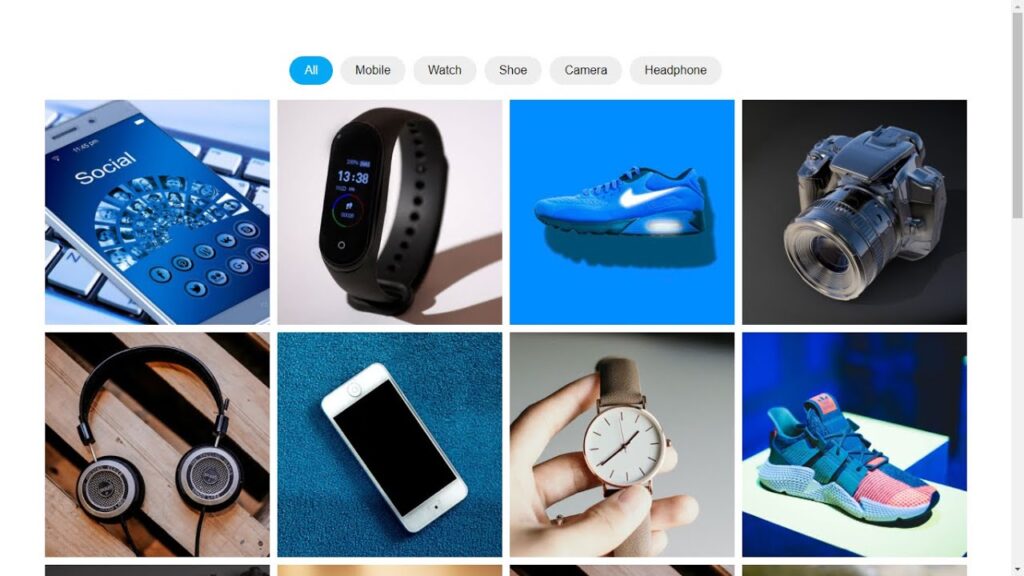
Creating a portfolio filter gallery using HTML, CSS, and JavaScript is a great way to showcase your work and allow users to easily navigate and filter through different categories. To start, you will need to have a basic understanding of HTML, CSS, and JavaScript. If you are not familiar with these languages, it is recommended to start with some beginner tutorials before proceeding.
To create a filter gallery, you will need to create a layout for your portfolio items and set up the HTML structure for each item. This can be done using a combination of div elements, lists, and other HTML tags.
Once you have the HTML structure set up, you can use CSS to style the layout and appearance of your portfolio items. This can include setting the font, colors, and other design elements.
To add the filtering functionality, you can use JavaScript to create event listeners that trigger when a user clicks on a filter button. These event listeners can then hide or show the relevant portfolio items based on the selected filter. It is also a good idea to consider the user experience when designing your filter gallery. This can include adding responsive design to ensure that the gallery looks and functions well on different devices, as well as adding loading indicators or other visual cues to let users know the status of the filtering process.
Video Tutorial of How To Create A Portfolio Filter Gallery Using HTML, CSS & JavaScript
The video tutorial for creating a portfolio filter gallery using HTML, CSS, and JavaScript is available for your reference. If you find it uninteresting, you can download or copy the code provided. To create this filter gallery, you will need to create three files – one HTML file, one CSS file, and one JavaScript file. Once you have these files, paste the provided code into them. Specifically, create an HTML document named “index.html” and paste the code into it. Remember to give the file an “.html” extension.
<!DOCTYPE html>
<html lang='en'>
<head>
    <meta charset='UTF-8'>
    <meta http-equiv='X-UA-Compatible' content='IE=edge'>
    <meta name='viewport' content='width=device-width, initial-scale=1.0'>
    <link rel='stylesheet' href='style.css'>
    <title>Portfolio Filter Gallery| Created by S-Tech04</title>
    <!-- S-Tech04 | www.youtube.com/STech04 -->
</head>
<body>
    <section>
        <ul>
            <li class="list active" data-filter="all">All</li>
            <li class="list" data-filter="mobile">Mobile</li>
            <li class="list" data-filter="watch">Watch</li>
            <li class="list" data-filter="shoe">Shoe</li>
            <li class="list" data-filter="camera">Camera</li>
            <li class="list" data-filter="headphone">Headphone</li>
        </ul>
        <div class="product">
            <div class="item-box" data-item="mobile"><img src="./images/mobile1.jpg"></div>
            <div class="item-box" data-item="watch"><img src="./images/watch1.jpg"></div>
            <div class="item-box" data-item="shoe"><img src="./images/shoe1.jpg"></div>
            <div class="item-box" data-item="camera"><img src="./images/camera1.jpg"></div>
            <div class="item-box" data-item="headphone"><img src="./images/headphone1.jpg"></div>
            <div class="item-box" data-item="mobile"><img src="./images/mobile2.jpg"></div>
            <div class="item-box" data-item="watch"><img src="./images/watch2.jpg"></div>
            <div class="item-box" data-item="shoe"><img src="./images/shoe2.jpg"></div>
            <div class="item-box" data-item="camera"><img src="./images/camera2.jpg"></div>
            <div class="item-box" data-item="headphone"><img src="./images/headphone2.jpg"></div>
            <div class="item-box" data-item="headphone"><img src="./images/headphone1.jpg"></div>
            <div class="item-box" data-item="mobile"><img src="./images/mobile3.jpg"></div>
            <div class="item-box" data-item="watch"><img src="./images/watch3.jpg"></div>
            <div class="item-box" data-item="shoe"><img src="./images/shoe3.jpg"></div>
            <div class="item-box" data-item="camera"><img src="./images/camera3.jpg"></div>
            <div class="item-box" data-item="headphone"><img src="./images/headphone3.jpg"></div>
            <div class="item-box" data-item="mobile"><img src="./images/mobile4.jpg"></div>
            <div class="item-box" data-item="watch"><img src="./images/watch4.jpg"></div>
            <div class="item-box" data-item="shoe"><img src="./images/shoe4.jpg"></div>
            <div class="item-box" data-item="camera"><img src="./images/camera4.jpg"></div>
            <div class="item-box" data-item="headphone"><img src="./images/headphone4.jpg"></div>
        </div>
    </section>
    <script src="./script.js"></script>
</body>
</html>
Second, make a CSS record with the name of style.css and paste the given codes in your CSS document. Keep in mind, you’ve to make a record with .css extension.
*
{
    margin: 0;
    padding: 0;
    box-sizing: border-box;
    font-family: sans-serif;
}
section
{
    margin: 40px auto;
    padding: 30px;
    width: 100%;
}
section ul
{
    display: flex;
    justify-content: center;
    align-items: center;
    flex-wrap: wrap;
    margin-bottom:10px;
}
section ul li
{
    list-style: none;
    padding: 10px 20px;
    background: #eee;
    border-radius: 20px;
    font-size: 16px;
    letter-spacing: 1;
    cursor: pointer;
    margin: 5px;
}
section ul li.active
{
    background: #03a9f4;
    color: #fff;
}
section .product
{
    display: flex;
    justify-content: center;
    align-items: center;
    flex-wrap: wrap;
}
section .product .item-box
{
    width: 300px;
    height: 300px;
    position: relative;
    overflow: hidden;
    margin: 5px;
}
section .product .item-box.hide
{
    display: none;
}
section .product .item-box img
{
    position: absolute;
    top: 0%;
    left: 0%;
    width: 100%;
    height: 100%;
    object-fit: cover;
    transition: 0.3s;
}
section .product .item-box:hover img
{
    transform: scale(1.3);
}
last, create a JavaScript file with the name of script.js and paste the given codes in your JavaScript file. Remember, you’ve to create a file with .js extension.
const list = document.querySelectorAll('.list')
const itemBox = document.querySelectorAll('.item-box')

list.forEach((elem)=>{
    elem.addEventListener('click',function(){
        list.forEach((elem)=>{
            elem.classList.remove('active');
        });
        this.classList.add('active');

        let value = this.getAttribute('data-filter');
        itemBox.forEach(element=>{
            element.classList.add('hide');
            if(element.getAttribute('data-item') == value || value == "all"){
                element.classList.remove('hide');
            }
        })

    })

})
With these steps, you have successfully created a portfolio filter gallery using HTML, CSS, and JavaScript. If you encounter any errors or issues, you can download the source code files by clicking on the provided download button. The files are available for free and will be downloaded as a .zip file. Extract the files once they are downloaded and use them to troubleshoot any issues you may have encountered.